Break-down Lance Racks

In the last few years, jousting has begun to have a significant presence at many SCA equestrian events. Event stewards and marshals want to make the joust a nice showcase activity at events.

The action of the joust is not the only part of the activity that needs to look good. Banners flying, ground crew dressed for the occasion, steeds in beautiful barding, riders in their finest armor…
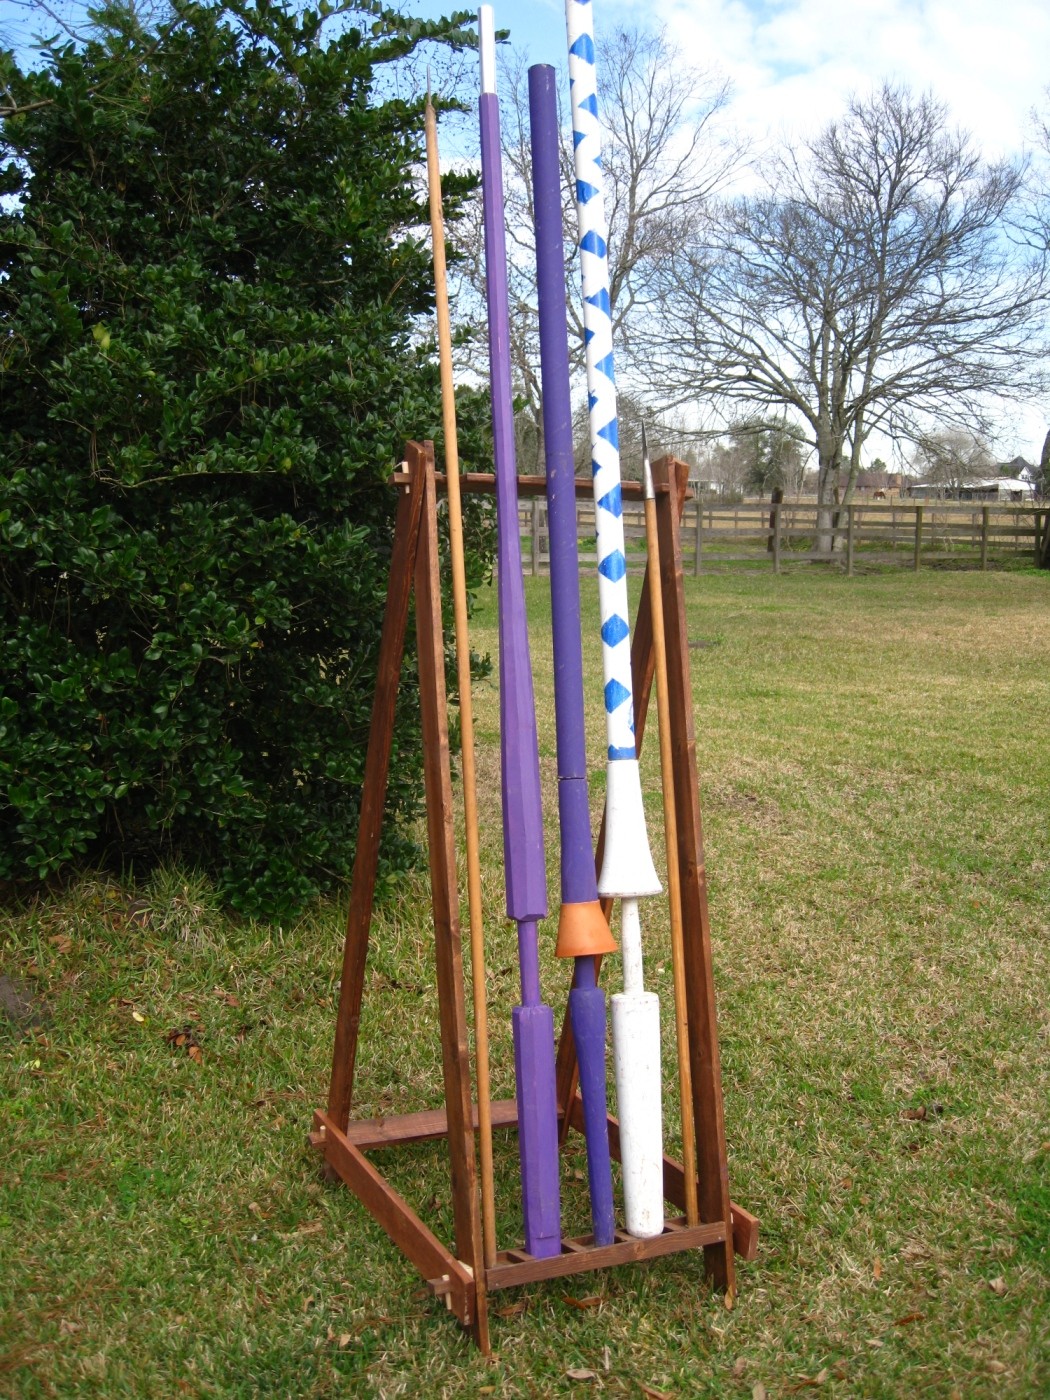
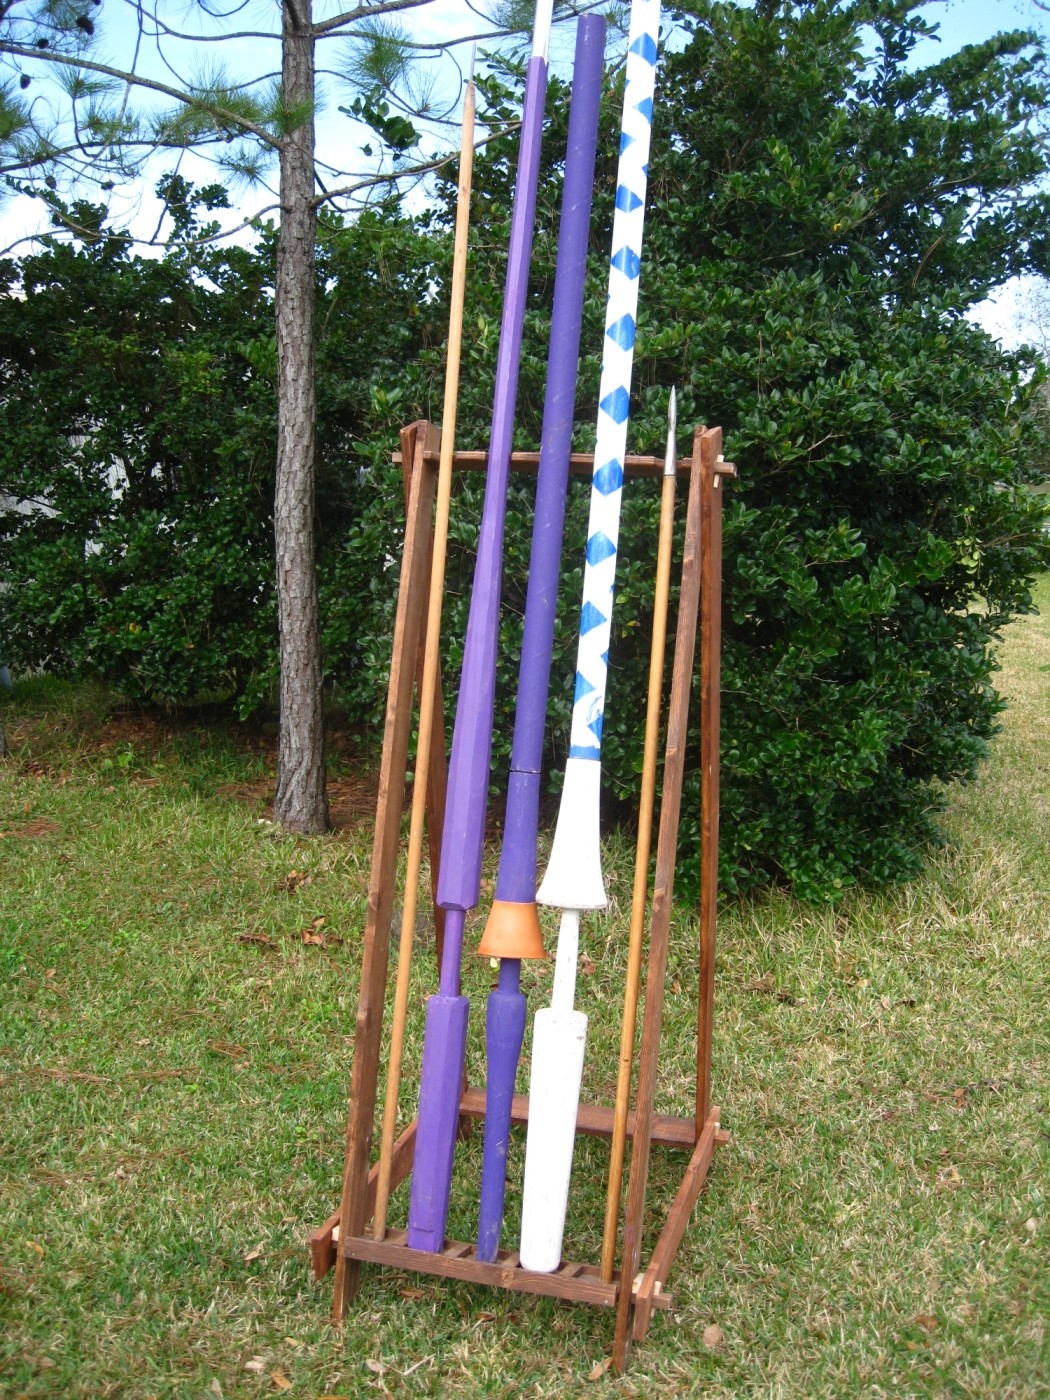
. and the equipment, those long decorated lances ready to break upon the opponent’s shield. This equipment is something to showcase. In the past we have found that lances often get laid up against a fence, if there is a fence at all, only to slide down to the ground in a jumbled mess of lances that are hard to sort out, that get damaged, and may even trip people due to their length on the ground. A wonderful option we have found is to use a lance rack that will hold 5 or 6 lances. This not only showcases the weapons used in the joust, but also helps ground crew organize lances for the current jouster and the jouster next up because the lances are standing up, ready for use, and easy to grab.

Period texts don’t refer to what was done with lances during jousting tournaments, nor do period images show lances around a jousting tournament. Maybe they simply had lances lying on the ground, or maybe lance racks were such utilitarian items they were commonplace and so not referred to or drawn/painted. The one 16th century image I can find with lances, seem to indicate they were stored vertically but the drawing’s perspective is a little off and no support structure is shown, so it is hard to tell whether they are vertical or lying down.

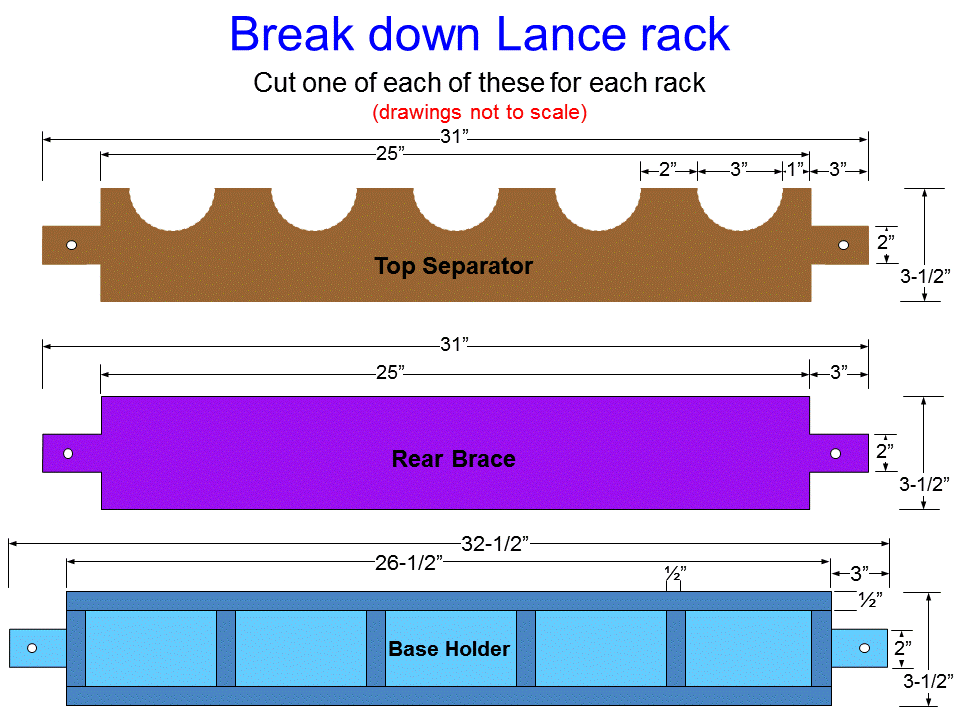
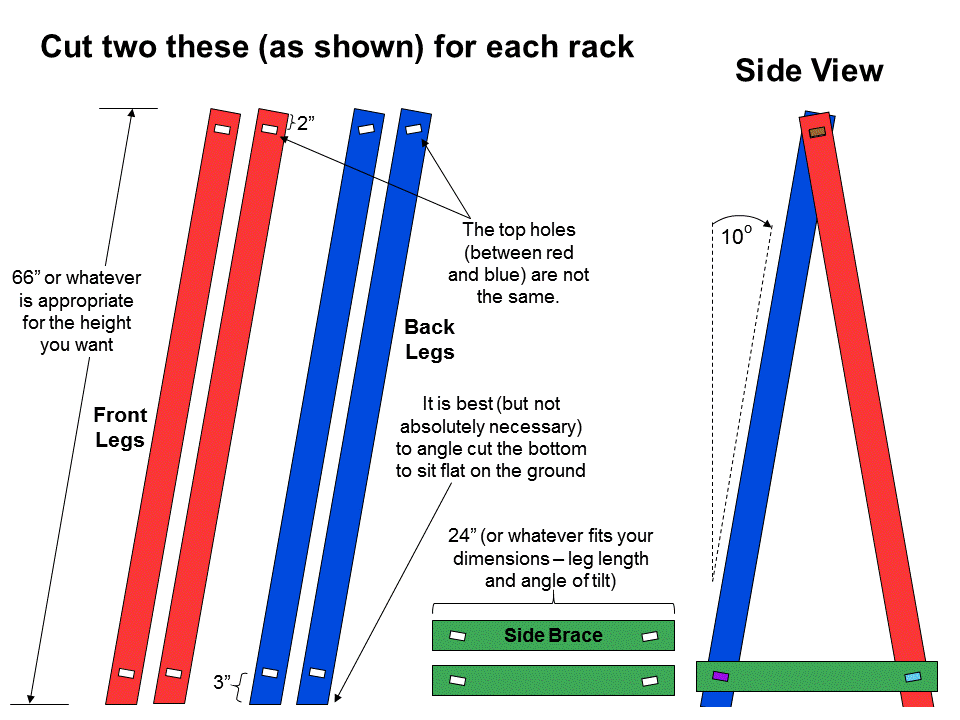
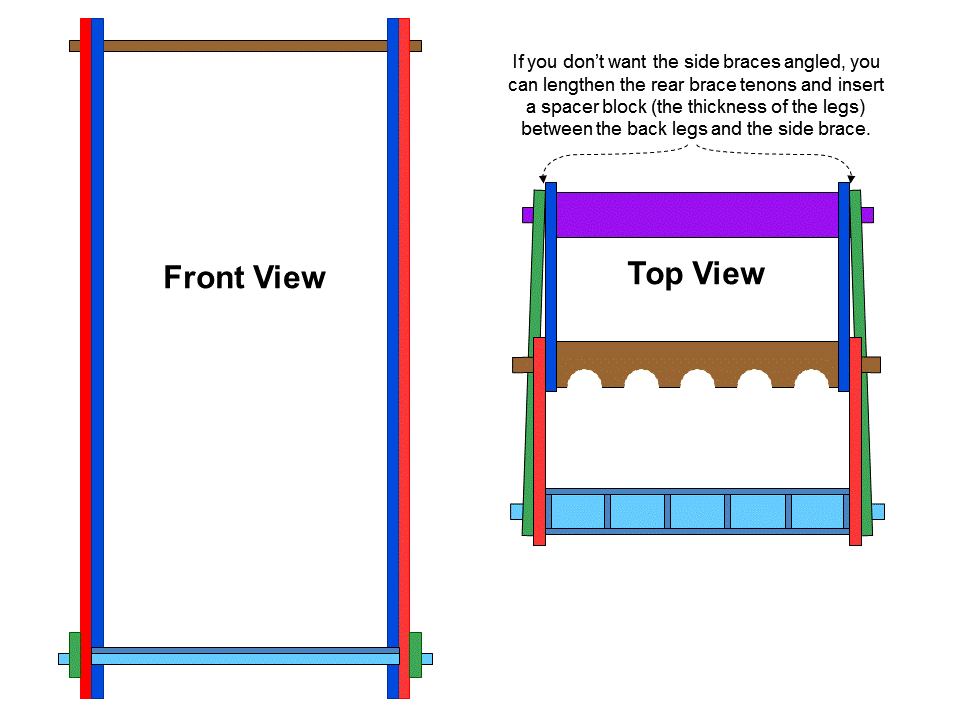
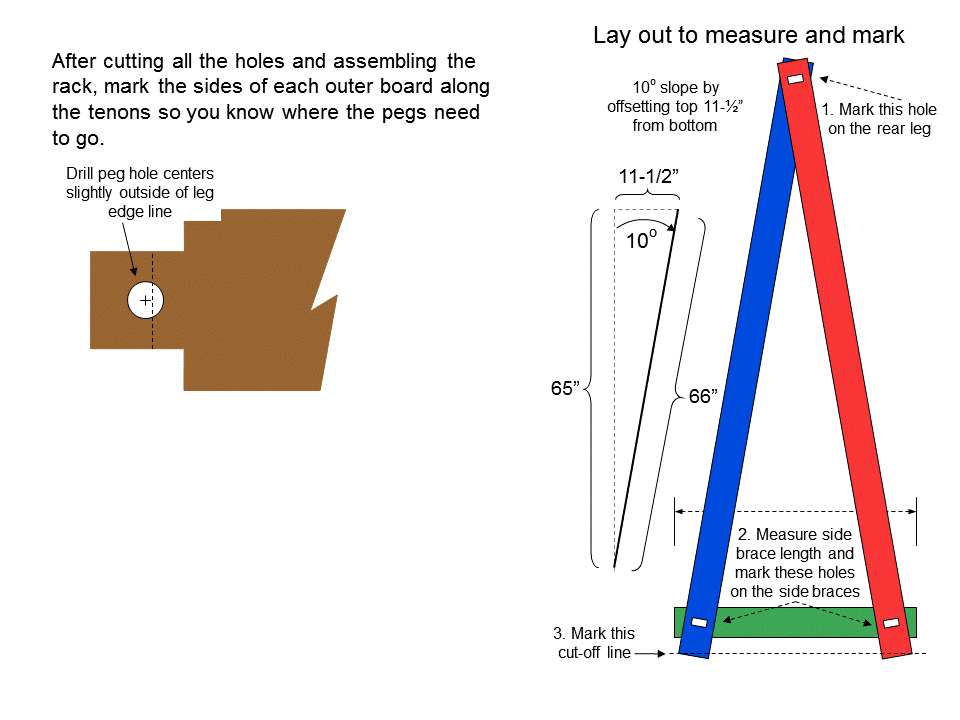
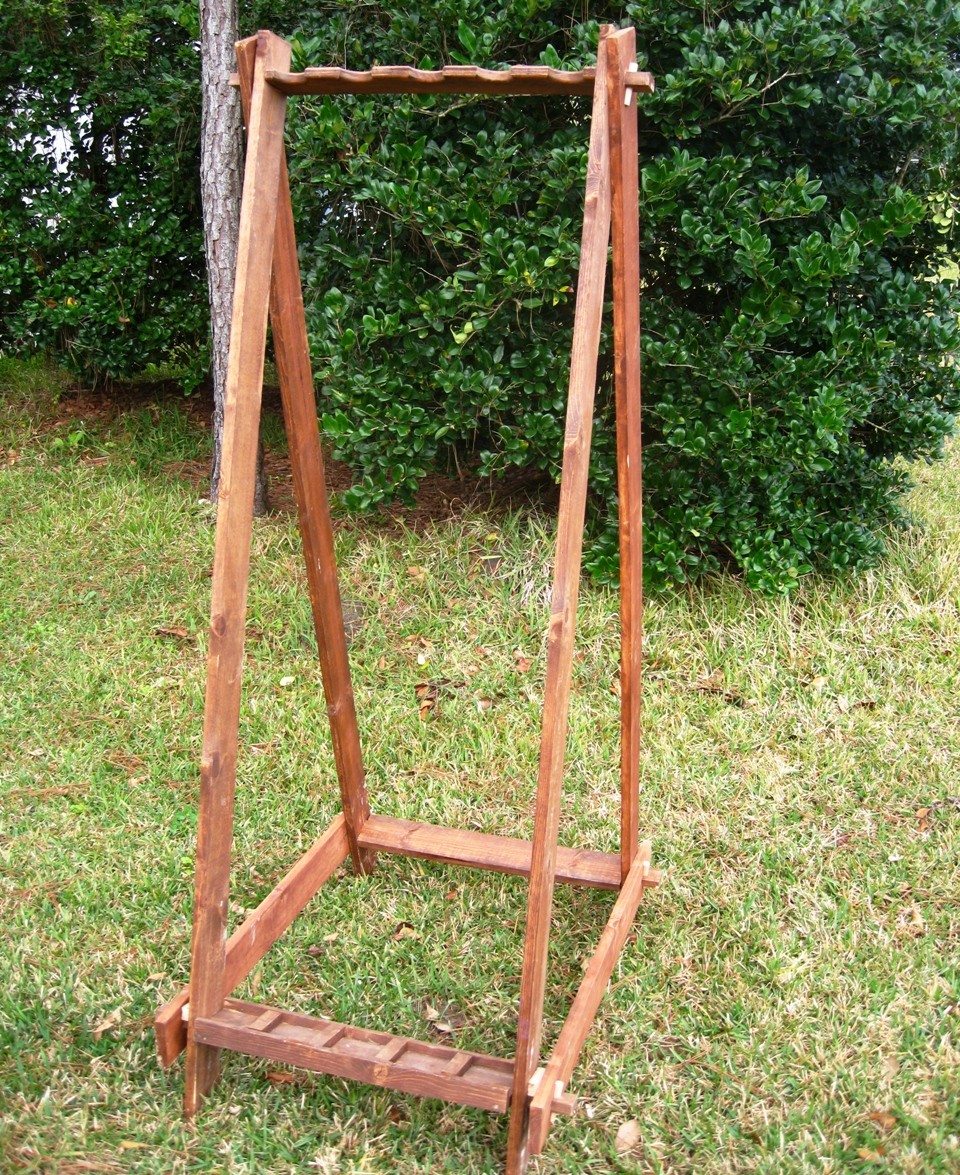
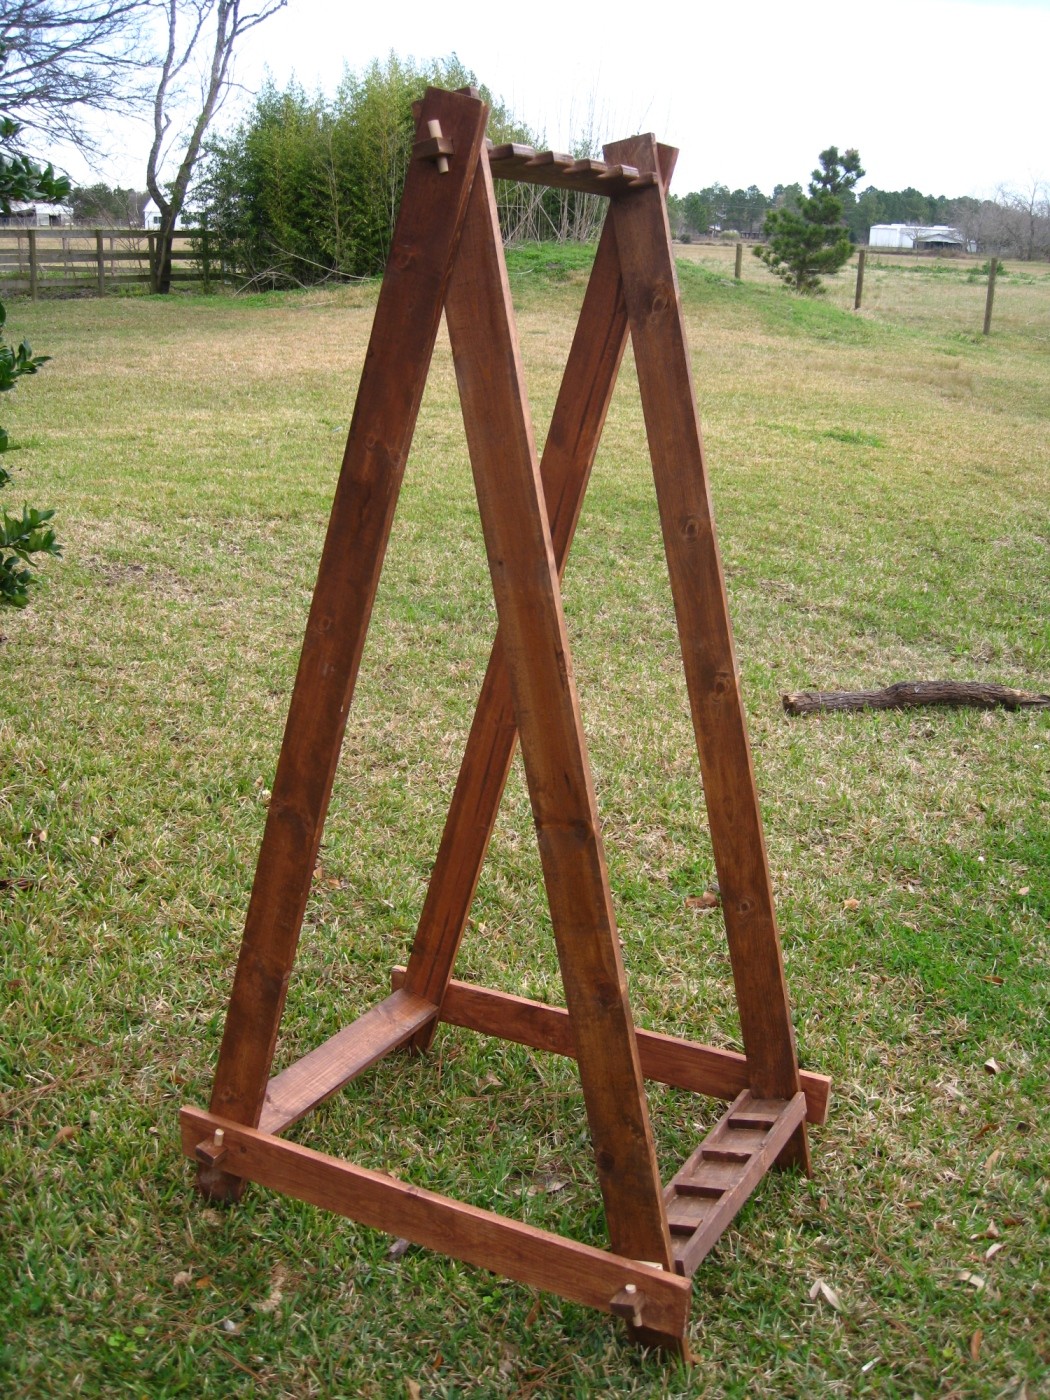
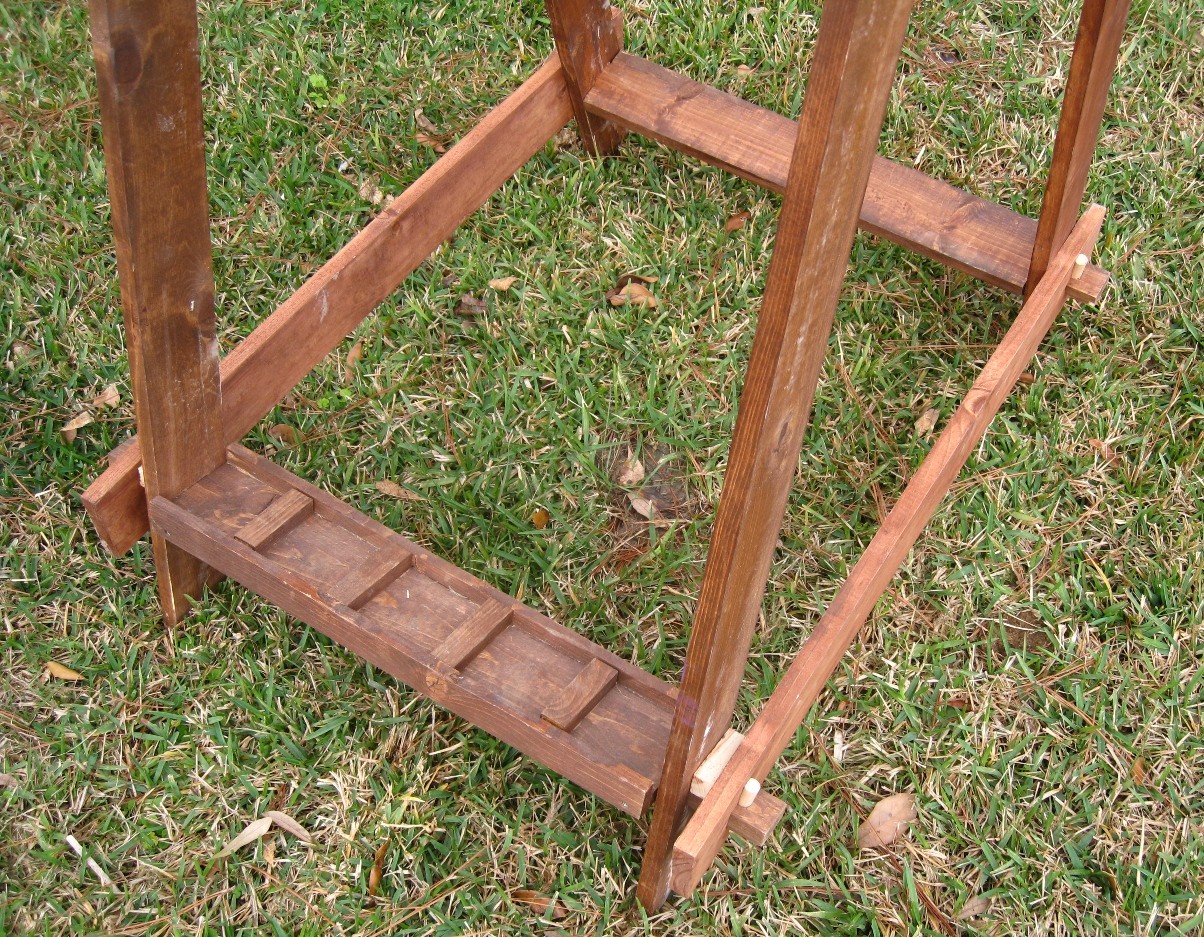
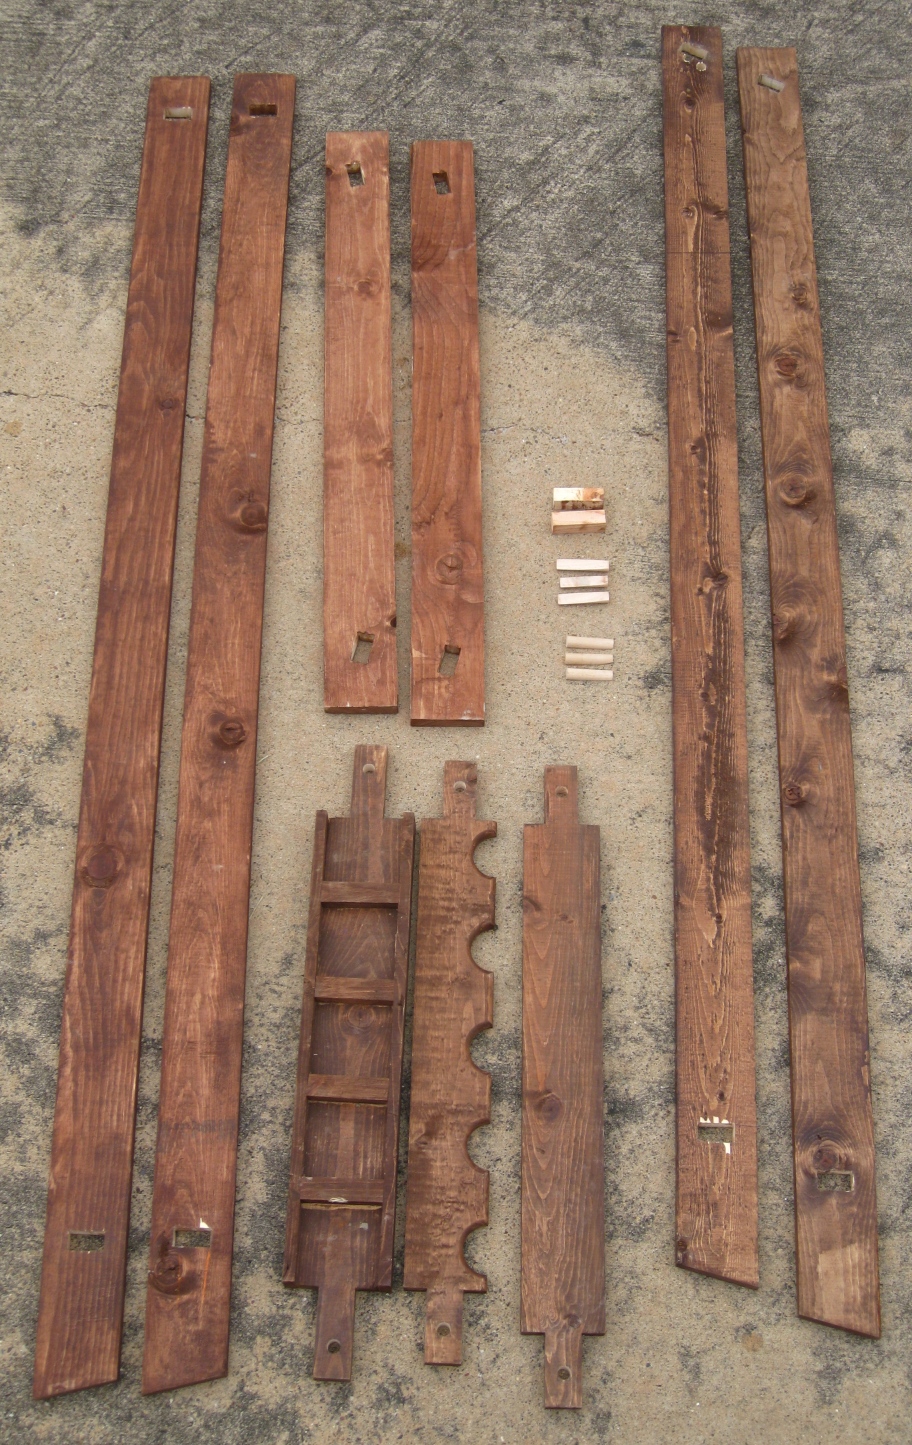
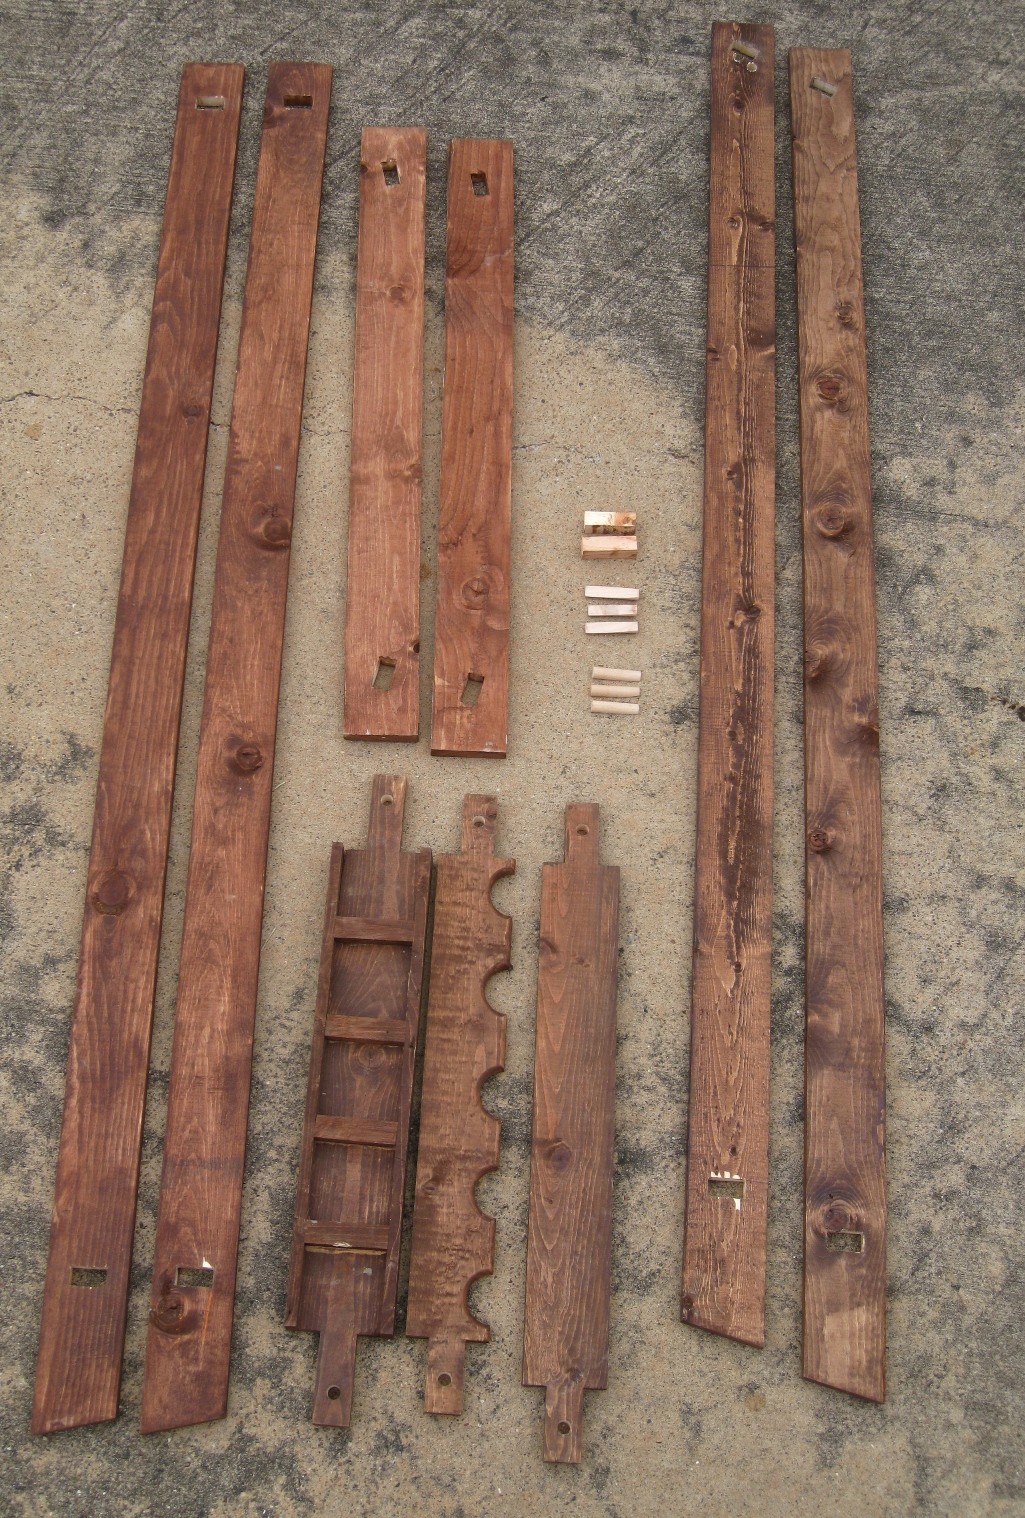
Anyone who has put on a jousting tournament can attest to the value of lance racks, both from functional support to the ground crew and aesthetic value in presenting tournament field “ready for a joust”. It also decreases potential trip hazards by removing lances that otherwise would be lying on the ground. I have developed a lance rack that comes apart and breaks down flat for easy transport. The lance rack is easy to set up and can be made with very basic tools. This article presents plans and information on how to build a break-down and easily transportable lance rack for your events.


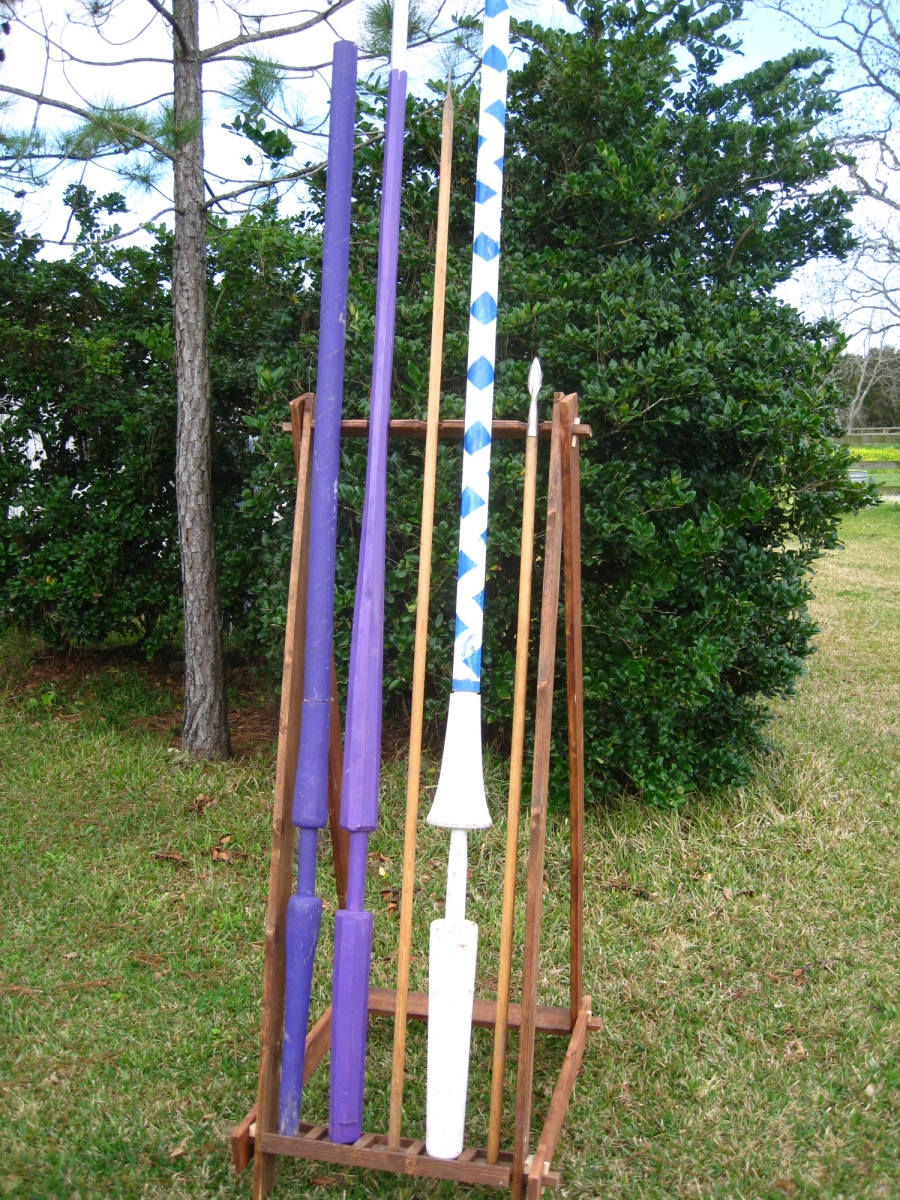
Figure 1: A lance rack with a variety of lances and spears

I have developed a lance rack that comes apart and breaks down flat for easy transport. The lance racks are very sturdy, are easy to set up, and can be made with very basic tools.

The first thing to do is figure how tall and how wide you want your rack. The width of the rack will affect how many lances the rack can hold at a single time. The plans included are for a rack that is 65 inches tall, with the lances 3 inches off the ground and supported at the top roughly 63” from the ground. (A 66” long board tilted at 10 degrees is about 65” tall.)


Materials:

  • 2 – 1 x 4 x 6’ boards (pine, oak, or poplar)
  • 3 – 1 x 4 x 8’ boards (same as above)
  • 72” - ½” x ½” trim board
  • 2 ft - ½” dowel


Standard 1x4 lumber works fine, but feel free to use 1x6 as well. Just adjust the measurements accordingly. Measure out all the pieces on the wood before you cut any so that you know how everything lays out. The 66” legs come from two of the 8-ft-long boards and the two 6-ft-long boards. The third 8-ft-long board is cut into the rear brace, the top separator, and the bottom base holder boards. The two left over pieces of the 8-ft boards used for legs will be the two side brace pieces.

Each of the thumbnails below is a link to the larger image. 


A. Create the front and rear legs

  1. Once you decide how tall you want the lance rack to be, cut the legs. Using my plans, cut four 1x4s 66” long (or 1” longer than the height you want) from two of the 8-ft boards and the two 6-ft boards. The “height” is the vertical measurement, not the length of the board, due to the 10 degree angle.

  2. 3 inches up from the bottom of all four legs, measure and cut a rectangular hole (2” wide by the ¾” thickness of the boards) centered on each leg and perpendicular to the edge of the leg.

  3. 2 inches down from the top of the front legs, cut matching rectangular holes. (We will cut the holes in top of the back legs shortly.)


B. Create the rear brace, top separator, and the bottom base holder

  1. Using the remaining 8-ft board, cut a 31” piece for the rear brace. See figure 4. Cut the tenons on the end of each board 3” long, but do NOT drill the peg holes yet.


  2. Next, using the remainder of the same board, cut a 31” piece for the top separator. See figure 5. One method for cutting the round lance cut-outs is to clamp a piece of scrap to the edge of the separator board (or use the separator board for a 2nd lance rack, and then use a 3” holesaw in the seam of the boards to cut nice round holes. Just measure carefully to start each hole. Cut the tenons on the end of each top separator 3” long, but do NOT drill the peg holes yet.


  3. Using the remainder of the same board, cut a 32-½“ piece for the base holder. See figure 6. Cut the tenons on the end of each board 3” long, but do NOT drill the peg holes yet. Cut two 27” pieces of the ½” x ½” trim board and glue/screw it down on each long edge. Cut six 2-½” pieces of the trim board and glue/screw them down between the edge trims (equally spread from the ends so you have 5 ‘sockets’). This makes sockets for the base of each lance/spear to rest in. An alternate option is to use 1” (tall) x ½“ (thick) trim, and instead of screwing it down on top of the long edge, you can screw it to the side of the long edge so the sockets are a little wider (front to back). If you do this, your six short pieces will need to be 3-½” long.


C. Create the side braces and cut holes

  1. Lay out one of the cut-offs from the 8-ft boards (used for legs) as the side brace, and then lay out a back leg with a front leg on top of it. A 10-degree slope works well to hold lances/spears, and this can be achieved with the top of the leg board offset 11-1/2” from the bottom. Adjust the back leg and then adjust the front leg so the tops of the legs are matched up and the bottoms are spread to get the slope you want. Ensure the side brace board is positioned centered up (from the bottom of the legs) at the height you want.

    1. Using the hole in the top of the front leg, mark the location of the hole for the top of the back leg.

    2. Measure and mark the rear brace to the appropriate length. Then mark the location of the rear brace holes using the holes in the bottoms of the front and back leg.

    3. Lastly mark the “ground level” line at the bottom of the front and back legs.

    4. Repeat for the other back leg and side brace. Cut the side braces to length and then cut all the holes. Lastly, cut the bottoms of the legs at the ground level lines.


D. Putting it all together

  1. Assemble the lance rack pieces, with the back legs first (on the top separator and rear brace), then the base holder and front legs, and then the side braces. The side braces will be angled from front leg to the back leg because the front legs are not directly in front of the back legs. See figure 8. If you don’t want the side braces angled, you will need to lengthen the tenons on the rear brace and insert a spacer block (the thickness of the legs) between the back leg and the rear brace. See figure 9. On both tenons of each left-right board (the top separator, the base holder and the rear brace), press the boards snugly toward the center of the rack along the tenon and then mark the edge line on each tenon.


    Figure 9: A spacer block


  1. Dis-assemble the rack and drill ½“ holes in the center of each tenon, with the hole center just outside the edge line marked on each tenon. See figure 10. Cut the dowel so you have six 4” pieces of dowel for pegs. Sand the side of one end on each peg so the peg is sloped for about 3-½“ of each peg.


  1. Re-assemble the rack and insert the pegs to check the fit. Figure 11. Paint or stain the pieces as desired. A small bag to hold the six pegs (and the spacer blocks if used) will be useful.


Figure 11: A close up of the top pegged together.


Voila! A nice lance rack to support your jousting tournaments. It is easiest to make a pair at one time, and then you have lance support for both ends of the field. Once made, you will find that the lance racks become virtually indispensable on the equestrian field because they are useful for holding lances for the quintain, spears and javelins for games, and you can even add a piece of ½“ x ½“ trim board with angled dowels to the back of the top separator to hold swords hanging across the back.
 

Drawings of the three horizontal boards. (64kb) The legs and side supports, along with a side view. (70kb)

Download the Powerpoint 2013 file or the PDF file of these drawings here.


A front view and top view of the pieces. (36kb)
Detail on marking the top holes, the side braces, and the side brace holes. (49kb)   The rack holding a variety of lances and equestrian equipment. (186kb)


Another shot. (198kb)
The empty rack. (200kb) A side view of the empty rack. (197kb) A close up of the base, showing the individual sockets to hold the base of each lance or spear. (143kb)

You can also see the "spacer block" in this picture.


A close up of the pin in the side at the top. (142kb) The various pieces of the rack. (142kb)


Another shot. (165kb)

Return to the Equestrian Equipment page or to the Greydragon library.